Kitchen Island, Barn Power – March 2024 Update
Welcome to my shop! This is a quick update to let you know what I’ve been up to. This big chunky thing is the leg
Work continues on the bandsaw mill and I got some time to do some woodworking!
https://www.youtube.com/channel/UC8NjHgDV5nHEfQGj7JNfp9Q

https://thewoodwhispererguild.com/product/farmhouse-table-benches/
a California King size head board I made for my sister. This is the first thing I’ve came up with the design on my own and actually sketched it out. The chevron pattern is made with reclaimed cedar fencing. The outer parts are made out of reclaimed lumber from a shipping crate. The borders are made from bought 1x3s and the framing is done with 2x6s and 2x2s on the back. I use a plywood backer for all my pattern stuff. I use titebond and brand nails from the back to create the smooth surface. Also added shelves for remotes or phones. The open space is where the bed will sit and the sides will stick out and go to the floor. The finish is just gloss Verathane polyurethane.
Website: www.walkersrusticwoodworks.com
Facebook: www.facebook.com/
Instagram: www.instagram.com/walkersrusticwoodworks
This walnut and steel conference table build (could also be a dining table) was my most involved woodworking project to date, including drawbored breadboard ends, processing rough lumber, panel glue ups, and more. The build also included a welded steel base using 1″ square tubing.
This is a coffee table that I built for our house. The top is made from strips of barn wood that I planed down to avoid the “barn wood” look and black walnut in the center that is scrap from another project I am working on. It is all attached to 3/4″ oak plywood to try and make it sturdier and cedar strips were used for trim around the edges. The base is made from 4×4 cedar posts. The vertical of the base is my first attempt at mortise and tennon joints while the rest are half lapped. The whole base is attached to the top using 4 1/2″ lag screws that I burned to darken the color. The whole table is finished with high gloss poly which really shows the grain well in my opinion.
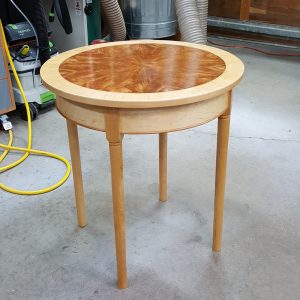
“The piece would need to have a 24-in.-dia. round tabletop and be about 26 in. high. After a couple of rough (very rough) sketches, I came up with a design and material selection, then got approval from my design consultant (my lovely wife, Judy) to move forward with the project.
The top will be a sunburst design using some spectacular cherry crotch veneer and curly maple veneer for the border and edge. Since the top is going to be the focal point of the piece, I will be using shopsawn flat-cut maple veneer for the skirt. I was also very lucky to find in my lumber rack some 8/4 maple stock with some very nice, straight grain that I could pull the legs from. The legs will also be turned round with very few extra details so as not to take away from the top.” – Except from FineWoodworking.com

Playlist: https://www.youtube.com/playlist?list=PL__Cj5bOsaAPYcVFBFP2ZUpbFwPUWtK4G


Welcome to my shop! This is a quick update to let you know what I’ve been up to. This big chunky thing is the leg

Welcome back to the home renovation. This time I’m going to be working on the kitchen island. Here is a small model of the island.

Welcome back to our home renovation. Today I am going to be working on this wall. It needs some upper cabinets and the surround for
9 Responses
Hey Matt been enjoying your video on the bandsaw mill .I have been doing custom cabinets in residential and commercial cabinets for 25 +years I have always wanted to build me a band sawmill. Just wondering where you purchase the band wheels and Acme threaded rod and other items you had to purchase in order to build thanks Jason Ham ham’s custom woodworks athens al
Hey Matt, I love your stuff. It’s great to see another midwesterner battling the seasons. I can’t wait to see the things you make once the mill is done. My dad has an old Woodmizer that I’ve had the privilege of running a few times. It’s great fun. Keep doing awesome stuff and educating us all.
Thanks Aaron! Battling is a good way to put it 🙂
Thanks for the shout out Matt! Hope to get to your level on day man.
Thanks Johnny!
Great stuff Matt, thanks for sharing!
Thanks Fred!
I love your band Saw Mill so far. Make sure all your vertical tubes are sealed completely because if they fill with water and freeze itheywill be pushed into a round tube. The tubes in the door on my trash enclosure at work got water into them and deformed them into round looking tubes. Your job looks great but just make sure they’re sealed
The verticals are capped on top but I left the bottoms open just in case any water did get in there some how. Thanks Jerry!